In this blog let’s try to connect to a home network from outside (internet) in a secure manner using SSL.
NAT and PAT
NAT and PAT is what allowed local IP addresses translation or mapping to some routable public IP address (over the internet). This mapping can be one to one (NAT) or many to one (PAT or overload).
From the inside to the outside,
Using only my Box (FTTH), I’m able to access my home network (box Lan subnet) by simple NAT redirection from any internet location. More precisely, I connect to as many hosts, residing in my home network, as many redirection rules allowed on my box.
My box supports only an overload NAT of my inside local addresses. To access internet any local host maps to the external public address using PAT. Returning traffic is matched to the opened ports for PAT operation and sent to the correct local host.
Now initiate the connection from the outside
If I access my network from the outside using my inside global routable address on internet, using my unique public address, I have only the possibility to redirect application port to a local port and address that belongs to the subnet of clients, that is connected directly to LAN ports of my box.
To access from a remote location I use my smartphone that is configured to share via Wifi it’s 4G mobile internet access. The only difference is that NAT is done by access provider (not the smartphone). The only way to get the public internet routable address used to NAT my smartphone trafic is to capture (wireshark) all incoming trafic at the destination (my Box).
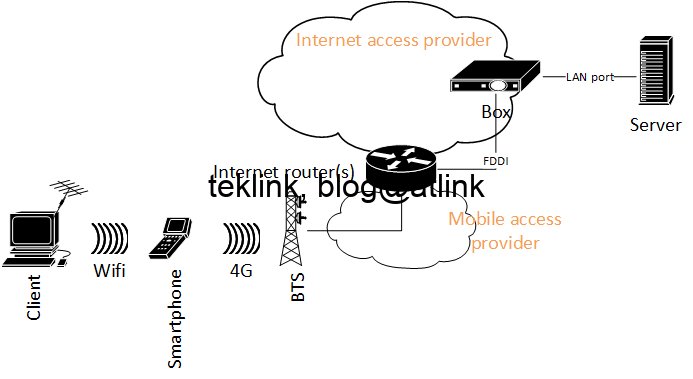
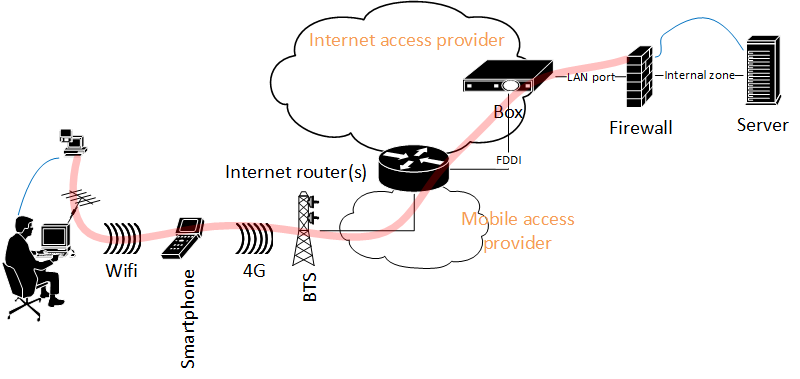
Lab setup
The network topology is described in Figure. 1.
Any man in the middle could intercept Client to Server communication. To secure this communication, I create an overlay VPN between the Client and Server.
My Fortigate 60C firewall offers two possibilities: IPSec site-to-site VPN, or SSL VPN. Here for simplicity I choose to work with SSL VPN. Because SSL VPN build on TCP layer (more exactly over TLS) and there’s no need to secure IP layer, NAT is not a problem. In other scenarios, IPSec would be a better choice.
Firewall and client configuration for VPN SSL operation
In Figure. 2, we show how the VPN is implemented. The Client / Server communication (in blue) is embedded into the secured tunnel (in red) established between the VPN client software, FortiClient VPN 6.2.0, and the security gateway (firewall), FortiOS 5.2.4.
The firewall configuration is straight forward:
- trafic from the client should be allowed by the firewall
- the firewall should be configured to listen to VPN protocol on the interface facing the client
- by default the protocol is listening on port 443
- in tunnel mode, we configure the address range the clients receive upon successful tunnel establishment. This vpn address is what a vpn client uses to access the server or other networks behind the firewall.
- an authentication policy must be configured to allow the clients build the tunnel
- after tunnel establishment, a route must be added to the firewall to indicate what address range is attached of the ssl.root vpn interface
- at the end, trafic from vpn clients to destination firewall zones must be allowed and NATed (to ease routing effort)
Troubleshooting
For troubleshooting purpose, we use wireshark in client PC to confirm that the vpn client-side TLS protocol exchange and response from the server if any. The client vpn has a debug utility to trace tunnel establishment steps. On windows it is necessary to check routing table to confirm that a default route is installed with a better metric and that points to the security gateway.
At server side, we may capture the trafic exiting the box and arriving to the firewall. A “diagnose debug application sslvpn”, enables debugging of SSL VPN. A “diagnose debug flow”, may help spot routing issues upon tunnel successful establishment.
Further
We’ve seen how straight forward the configuration of a VPN: a secure way to connect to my home servers from outside (internet). NAT is necessary to connect my PC (on internet) to my server (using local ip address that is not routage on internet). After the routing is established, it’s time to configure the VPN gateway (server side) to accept VPN tunnel requests from the client (piece of software) installed on my computer.
We can deepen more our understanding of the offered features (by the Fortigate 60C) to find a way to add performance to our setup and more security. We could investigate for example, the advantage of implementing DTLS option. For information, DTLS allows the SSL VPN to encrypt traffic using TLS over UDP instead of TCP (which is heavy but more reliable in case of poor network condition). Find out the most secure client authentication and traffic encryption method supported by this implementation of SSL VPN and the impact of this feature on the quality of service.